How Starblaze combined simulation and emulation to design SSD controller firmware
This case study describes how the Beijing-based start-up realized its T10 Plus SSD controller using a simultaneous flow.
Starblaze is a Beijing-based fabless start-up. It was established in 2015, and taped out the prototype of its first target design, an SSD controller, within six months. Starblaze went on to tape out its first production chip, the STAR1000, in January 2017. That silicon has already been incorporated in a consumer SSD drive, the T10 Plus, from LITEON, the third largest SSD manufacturer.
In conversation with Lauro Rizzatti, Bruce Cheng, Starblaze’s chief ASIC architect, described some of the key decision choices and decisions the company took to develop the STAR1000.
Lauro Rizzatti: Bruce, can you start by describing some of the main challenges involved in the design of an SSD controller, and how you were able to overcome them.
Bruce Cheng: In an SSD controller, the firmware determines the major features of the controller. So, the primary design challenge is to develop firmware and hardware together and as soon as possible. To get the best performance and lowest power consumption, the firmware must be fine-tuned on well-optimized hardware.
Most hardware components, apart from a CPU, system bus and a few peripherals like UART, are designed from scratch and must be carefully optimized according to the firmware usage. Essentially, the SSD firmware is customized and optimized to fit the hardware.
The storage media driven by the SSD controller, whether it is NAND Flash or some other new emerging type of media, really determines the complexity of the controller.
To overcome the challenge, we adopted a software-driven chip-design flow in contrast to a traditional hardware/software design flow where hardware and firmware development are serialized, starting with the hardware and following with the software. In a software-driven design flow, the firmware development starts at the same time as the hardware design begins (Figure 1).
The design flow initiates with a definition of the product specs, and that involves simultaneously both the firmware team and the hardware team. When changes are required –– for example, if additional registers or some specific functions are necessary –– the firmware engineers can ask their hardware colleagues to implement those bits. Any bug or any optimization requirement –– for instance, a late design request or feature change –– can be implemented on-the-spot in the hardware.
This parallel hardware/firmware approach accelerates the development cycle and avoids delays in getting into production typically caused by late firmware. By the time the design is ready for tape out, hardware and firmware have been optimized and are virtually ready for mass production. Very little time is spent in chip bring-up after tape out.
LR: So what verification environment are you using to achieve this?
BC: Our design verification and validation environment requires a high-performance system as close to the real chip environment as possible with powerful debug capabilities and easy bring up.
We deploy simulation and emulation simultaneously (Figure 2).
The simulator model of the design is created in C and C++. It is a register-accurate model that can be designed much faster than designing the hardware.
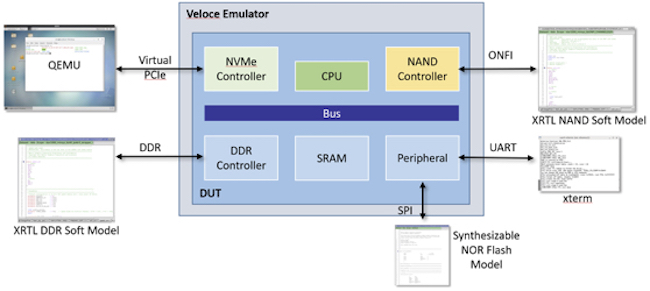
The emulator is Mentor’s Veloce. When deployed in virtual mode, all peripherals are modeled in software providing full control and visibility of the emulation environments, including design under test (DUT), peripherals and interfaces (Figure 3)
In the virtual mode, PCI traffic can be monitored, while a QEMU virtualizer runs on the host, providing complete control of the software. The content of the DDR memory, NAND Flash and SPI NOR Flash can be read and written, and their types and sizes modified.
We use Mentor models for the NAND flash that are accurate. In fact, when we got the chip back from the foundry, none of the changes that typically arise because of differences between the model and the actual physical NAND were necessary.
The virtual setup also added three unique capabilities not possible with a physical setup.
First we could get remote access 24/7 from anywhere in the world.
Second, the emulator was a sharable resource across multitude concurrent users
Third, the same clock frequencies of the DUT and peripherals eliminated the need for speed adapters to accommodate the fast physical peripherals to the slow running clock of the emulator, and enabled realistic performance evaluations.
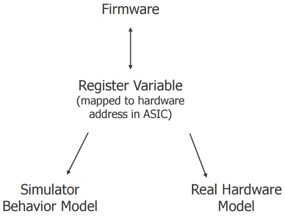
When we emulate an embedded system-on-chip (SoC) design, we run the firmware on the actual CPUs mapped inside the emulator. The firmware accesses the SoC hardware components by writing and reading the registers mapped on the bus. Conversely, when we simulate the SoC design, we run the firmware on the x86 system compiled via GCC or Visual Studio. In this instance, the firmware accesses the SoC hardware components, written in C/C++ as behavioral models, through register variables that are mapped to hardware addresses in the SoC.
Basically, we compile the firmware on the ARC CPU core that is in the actual SSD controller, and compile that exact same firmware on an x86 CPU running on the host workstation (Figure 4). The firmware runs in either place without changes. In the behavioral simulation environment processed on a PC, we step through the firmware code just like it was in the actual emulator. The approach allows us to take the entire SoC through a register variable and map it to real hardware or to a behavioral model.
For example, consider a real hardware DMA controller (Figure 5). The firmware runs in the ARC processor included in the SoC, and it accesses the direct memory access (DMA) by writing and reading a register variable named ‘reg_dmac.’
The address of this variable is mapped to the hardware register address 0x2000300’ through the link file. When we write or read ‘reg_dmac,’ the internal DMA registers take that operation in C and map it to the DMA controller. This is how it works in real hardware.
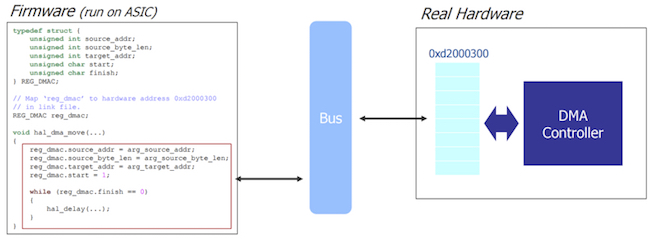
Figure 5. In the real SoC, the firmware accesses the DMA by writing/reading register variable named ‘reg_dmac’ (Starblaze).
In simulation, firmware and behavioral models communicate with each other through a shared global variable ‘reg_dmac’ (Figure 6).
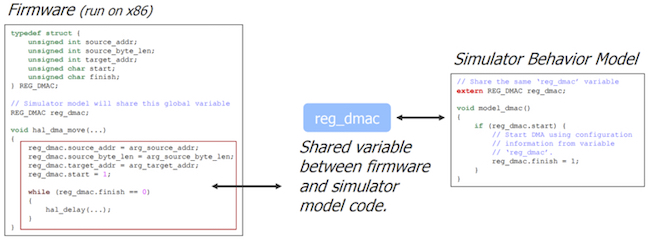
Figure 6. In the simulated SoC, the firmware accesses the DMA behavioral model through a shared variable (Starblaze)
There is no code difference in the firmware file. We have two identical files on the left for hardware and software. On the right, we have actual hardware (figure 5) or the behavioral simulation model (figure 6), ideal when some of the hardware blocks are still in development. As the hardware components created by the hardware team come alive, we synthesize and map them in the emulator and run the simulator on the behavioral models.
Not only can we run the same firmware code, but we can run the same stimulus.
Instead of waiting for the whole SoC implemented by the hardware team, we can start verifying it on day one, mixing mature blocks in emulation and blocks that don’t exist yet in simulation.
For example, we have two behavioral models #1 and #2, and the register transfer level (RTL) code of a DMA Controller (Figure 7).
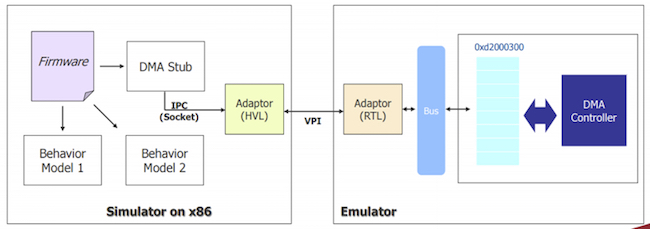
Figure 7. Starblaze deploys simulation and emulation simultaneously for a unified environment (Starblaze)
We compile the firmware on the x86 and run it with the two behavioral models in the simulator, and synthesize the DMA Controller and map it onto the emulator. We then create a DMA stub or wrapper in the simulator that via an inter-process communication (IPC) socket and a hardware verification language (HVL)/RTL adaptor communicates to the DMA controller in the emulator (Figure 8).
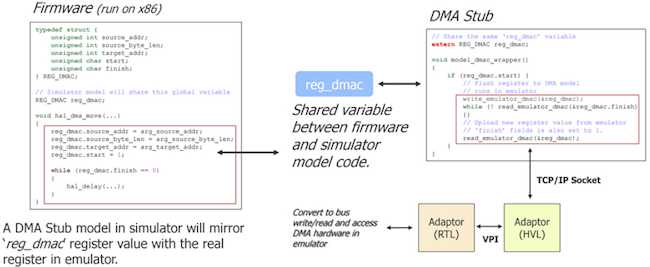
Figure 8. Starblaze creates a DMA stub in the simulator through an IPC socket and a HVL/RTL adaptor to communicate to the DMA controller in the emulator (Starblaze)
It is important to have a cohesive and homogenous environment when switching from simulation to emulation. We cannot swap firmware when switching from one to the other. The firmware needs to be basically the same. We made this a mandate from day one.
LR: Can you describe a bug you were able to pinpoint using this simulation/emulation environment?
BC: We had a boot problem. The NAND flash that contained the bootable code failed after several cycles. When testing a NAND or SSD device, it is important to test the code on a NAND device that has been aged since it has different properties than when it is fresh out of the box. Unfortunately, an aged NAND becomes flaky, and displays non-repeatable behavior. We run it once and get a failure. We run it again and that failure disappears.
Our simulation/emulation environment came to the rescue. We ran the firmware in simulation as fast as possible and once the boot failure occurred, we captured the exact same NAND data and moved it into emulation.
The scenario became completely repeatable. We could rerun that firmware as much as we wanted until we fixed the bug.
LR: Could you talk a little about the debugging capabilities of this environment?
BC: We added a couple of features to improve the firmware debug capability.
Debugging firmware is quite different from debugging RTL code. The firmware engineers can’t tell at which simulation cycle the bug occurs, but can tell in which function or C expression they see the bug.
We designed a firmware interface by accessing certain bus accesses to fully control the emulation process. The firmware calls application programming interface (API) functions to display current simulation time, to start, stop or pause the run, or to start dumping waveforms. This allows us to set breakpoints and stop to see the whole picture of things. We may even change some registers. (Figure 9).
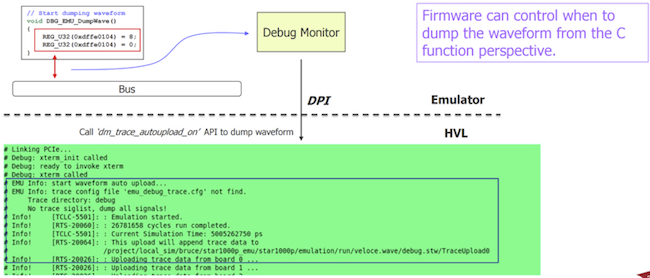
Figure 9. The firmware calls API functions to display current SSD controller simulation time, to start, stop or pause the run, and to dump waveforms (Starblaze)
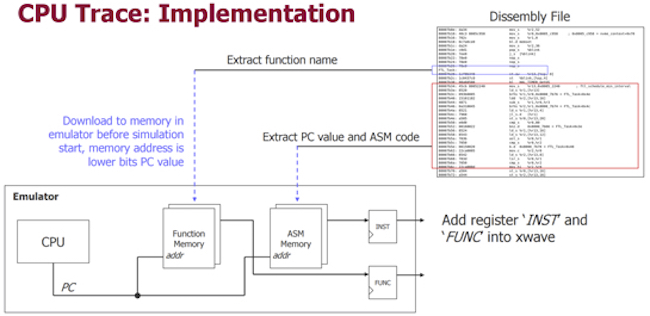
The other enhancement concerns the CPU trace. When the firmware runs into a bug or fires an assertion, it is important to know what sequence of functions the firmware runs before it hits the assertion. We designed a CPU trace module to continuously trace the PC value and map the PC value to its corresponding assembly code and current function. The result is a waveform that can simultaneously show the assembly code, function names and hardware signals.
I can give you a good example of a dump waveform (Figures 10 and 11).
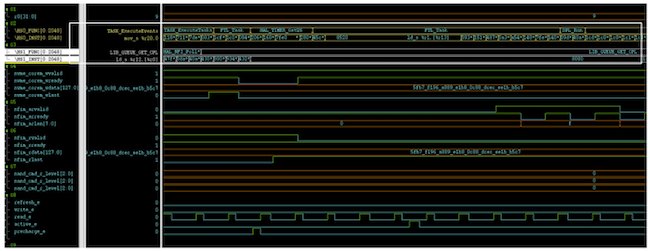
Figure 11. The waveform of the CPU trace capability can show assembly code, function names and hardware signals (Starblaze)
So how would you summarize your experience with this unified verification environment.
Time to market (TTM) is everything in the storage industry. If we can cut a week off the TTM, we can save millions of dollars. Emulation gave us the ability to start developing hardware and firmware together from the offset. By implementing the innovative features noted above, including hardware or the software debug features inside the waveform, we have been able to find many bugs that we fixed in hours instead of weeks if not months.
The unified simulator/emulator environment has opened up many possibilities. The symbiosis of the two allowed us to use the same stimulus patterns for hardware verification, software verification, and platform validation.
This has been a huge part of Starblaze’s success. In fact, Starblaze was able to shed four months off the SSD controller development cycle, easily justifying the purchase of a best-in-class emulation system.


