An introduction to System Verilog assertions
Assertions and assertion-based verification (ABV) are hot topics, but many engineering teams remain unfamiliar with the benefits they bring to the design and verification process. This article discusses the rationale behind them, the value they bring across the design and verification process, and offers a step-by-step approach to implementing them.
Implementing assertions requires that the engineer takes a conscious decision to view the design process differently. Typically, we develop a project in four stages.
- Gain an understanding of the requirements of the design/algorithm.
- Design RTL to implement a solution.
- Perform some simple testing to verify basic functionality.
- Debug any failures found by verification engineers after test.
There may be variations to this process (e.g., creating a micro-architectural specification), but such additional steps can still generally be considered within one of the categories above. Adding assertions, however, requires an additional step, which probably explains why designers have not readily adopted their use.
- Gain an understanding of the requirements of the design/algorithm.
- Design RTL to implement a solution.
- Add System Verilog assertions (SVAs).
- Perform some simple testing to verify basic functionality.
- Debug any failures found by verification engineers after test.
On the face of it, the additional step appears to lengthen the design process. But as designers begin to understand the power of assertions, they will readily adopt them if for no other reason than pure selfishness: spending time creating assertions minimizes time spent debugging later.
Benefits of assertions
Assertions incorporated into a design benefit both the design and verification engineers. Much time is actually spent debugging problems found during the verification process. Typical issues that arise there, especially for constrained-random testing, include:
- logic bugs in the design;
- inaccurate behavioral models based on poorly documented interfaces; and
- invalid programming or use models.
Designers appreciate the work done by verification engineers to test our work, but when one appears at your cubicle it generally means something failed that we now need to debug. In this case, we have to either interrupt our current work or put off debugging the testcase until we get to a good stopping point. Both scenarios result in an interruption of the verification engineer’s work, and the design flow generally. They are inherently inefficient and costly.
In many cases, assertions allow us to break this cycle. They essentially act as red flags during simulation to pinpoint failures that may either directly cause test failures or remain undetected.
Assertions on module interfaces can quickly identify invalid behavior that may be caused by a behavioral model or improper use of the design (e.g., invalid register settings, invalid operating modes). Such assertion failures indicate that a problem may be with the testbench, allowing the verification engineer not only to pinpoint the cause of the failure, but also to quickly update the testbench and continue with verification, often without even having to consult the design engineer.
In cases where the design is at fault, the design and verification engineers can quickly resolve the issue without extensive debug because they know where and when the failure occurred. Internal design assertions also help locate the root cause of failures that directly result in testcase failures. For instance, constrained-random testbenches often find corner cases such as FIFO overflow/underflow conditions that are normally not exercised by directed tests. Debugging failures such as these takes time since the designer has to trace back the failure at the end of a test (which may simply be invalid data in system memory) to the root cause of the failure. Including even a few simple assertions on internal FIFOs or interfaces will often locate these failures at the time and point of failure, eliminating the need for a lengthy debug session.
Lastly, assertions improve reuse since they capture intent that may be lost as design and verification engineers familiar with one project move to others. Some of this information may be captured in micro-architecture documents, but who really reads the manuals unless there is a problem? With assertions present, it is far more likely that problems integrating reusable logic will be found.
Ultimately, designers like to create things. As design engineers begin to understand how assertions reduce debug time and effort, they will realize that the time spent creating them pales in comparison. Some may even come to view adding assertions as a creative challenge.
A different mindset
Adding assertions requires the designer to think of the design from a different point of view. Instead of viewing signals as the implementation of a solution, designers must step back and think about what rules the design, bus/signal protocols, and/or usage model impose on these signals. These rules must then be coded in an assertion language such as the SystemVerilog Assertion language (SVA) to capture the behavior of individual signals or the interaction of several related signals.
It is important to note that assertions should not simply recreate rules forced on signals by a particular implementation. For instance, coding an assertion to recreate the transitions in a state machine is probably not terribly useful. However, coding assertions that relate events occurring at a module’s interface to the behavior of a state machine can be very powerful.
In order to focus on the process of developing assertions, this paper will consider the creation of a simple subset of assertions for ARM’s AXI bus interface. In doing this, we simplify the assertion writing process since the assertions will be composed for the well-known ARM protocol, and we can use the AXI specification as our list of requirements.
Creating assertions
1. Identify target modules and signals
The first step when adding assertions is to identify the module or group of signals to which they should be applied. Generally it is easier to describe the behavior of control signals than data signals since algorithmic operations do not lend themselves to simple behavioral rules. Control signals, however, often are responsible for responding to external and internal stimulus, and thus, their behavior and interaction are more readily described. For our AXI example, we will identify the entire set of AXI signals as our target, but for more general applications, designers may choose to dedicate more time to adding assertions at interface boundaries or modules with high levels of control logic.
Adding assertions at the boundary of a module provides an additional benefit. In addition to checking that the internal logic is compliant, they confirm that the external environment behaves according to these rules. These assertions can therefore look for invalid testbench configurations or protocol violations as well as problems in other blocks that would later be interfaced to this module.
2. Create rules by paraphrasing intent
Many engineers are overwhelmed by the prospect of adding assertions, mainly because it takes time to think of a rule and then code the associated assertion. Constantly switching between a right-brain activity (exploring associations) and a left-brain activity (synthesizing the associated SVA construct) makes the process seem very disjointed.
A better approach is to split the process into two separate steps. First brainstorm as many rules as possible, and simply write each as a phrase much like an RTL comment. Later, take all these phrases and code them as SVAs. By doing this, you will find that you can create a richer set of assertions while streamlining the procedural aspects of coding the assertions.
For our AXI example, we might brainstorm the following rules for the write address bus (these are just a few):
- AWBURST may never be 2’b11 (reserved).
- AWCACHE must never be 4’b010x, 4’b100x, or 4’b110x.
- When AWVALID goes high, it must remain high until AWREADY is asserted.
- When AWVALID goes high, AWADDR/ID/LEN/SIZE/etc. must remain stable until AWREADY.
- When an address is accepted (AWVALID & AWREADY) we must see a corresponding response with the same ID (BVALID & BREADY) at some point later in time.
Each of the AXI channels shares some of these rules, so many can be reused when creating assertions for the other AXI signals. Many of these rules come directly from the AXI specification—all an engineer needs to do is read the specification and look for phrases that can be interpreted as rules.
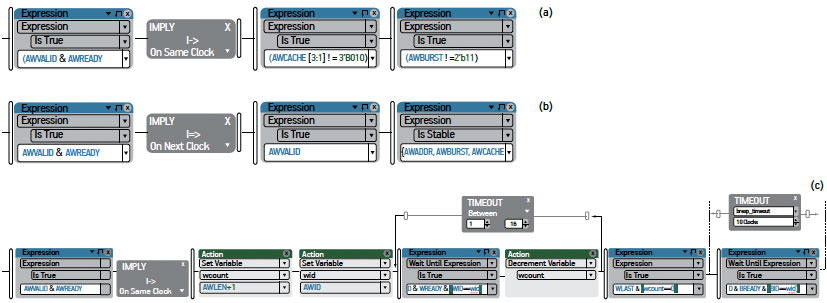
Figure 1
AWBURST and AWCHACHE checking (combined
)Figure 1b
AWVALID high until AWREADY and stable controls
Figure 1c
Full check of address write through data transfer
and write response
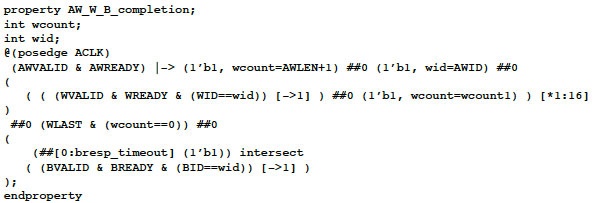
Figure 2
Full sequence
3. Code SVA assertions
Now that we have a list of rules, we will switch over to our left-brain to code the SVA statements. This is made much easier since we already have a description of the rule and simply need to find the best way to express it in SVA. At this point, engineers have to choose: they can either code in the SVA by hand or use a third-party tool to automate the task.
Coding directly in SVA, the assertions from step 2 are as follows (just the SVA sequences are shown):
- AWVALID & AWREADY |-> (AWBURST!=2’b11)
- AWVALID & AWREADY |-> (AWCACHE[3:1]!=3’b010) & (AWCACHE[3:1]!=3’b100) & (AWCACHE[3:1]!=3’b110)
- AWVALID & ~AWREADY |=> AWVALID;
- AWVALID & ~AWREADY|=>$stable({AWADDR,AWID,AWLEN,AWSIZE,AWCACHE,AWSIZE})
The final assertion (not shown above) is more complicated and would probably take someone experienced in SVA to code it. However, all of these assertions are easier to code using an appropriate EDA tool. One example here would be Zazz from Zocalo Tech, as shown in the sequence in Figures 1a, 1b and 1c. The full SVA sequence for Figure 1c is pretty intimidating, as shown in Figure 2.
4. Debug assertions
Assertions are just like any other logic construct, so it is imperative that they are coded to accurately describe design behavior. Otherwise, design and verification time will be spent debugging false assertion failures, negating the benefit of using assertions in the first place.
Traditionally, assertions are debugged by running dynamic simulations or using formal tools to exercise the logic and assertions. Failures in the design and assertions are then iteratively corrected as verification proceeds.
Often simple assertions require little debug since the rules they convey are fairly absolute. For instance, the assertion “AWVALID must be de-asserted during reset” (~ARESETn |-> ~AWVALID) is pretty difficult to code incorrectly.
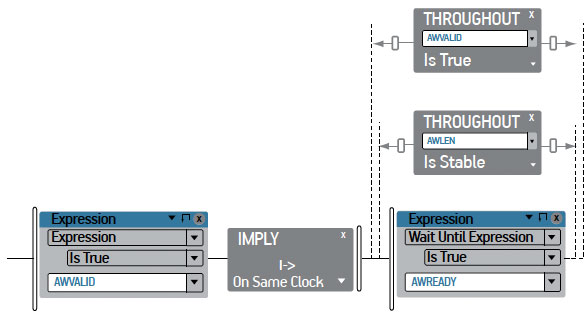
Figure 3
AWVALID must remain asserted until AWREADY and AWLEN must remain stable throughout this time
More complex assertions present a different issue. Often when coding an assertion that describes the interaction between two or more signals, the designer envisions a waveform that describes this behavior and then codes an SVA to describe these relationships. The problem is that SVA is a temporal modeling language, which is inherently different from modeling digital logic. This often leads to problems where the designer’s intent in the coded SVA does not match the actual behavior of the assertion.
Figure 4
Waveform for Figure 3 assertion.
The problem is that a designer needs to close the loop between the assertion intent (the mental image of a waveform) and the actual behavior of the assertion (the coded SVA). Zazz addresses this issue by generating a small randomized testbench around each individual assertion, allowing the designer to immediately observe behaviors associated with the assertion, thus closing the loop between intent and behavior. As an added benefit, this process often leads designers to see additional relationships that should be described to more fully constrain behavior, leading to even higher quality assertions.
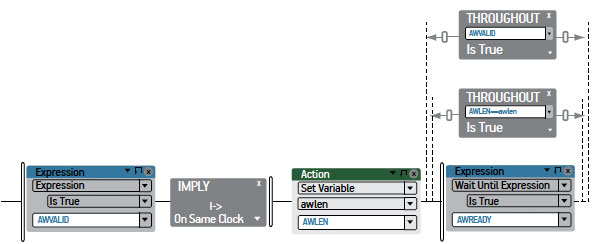
Figure 5
Corrected assertion in Zazz.
As an example, let’s code the assertion “AWVALID must remain asserted until AWREADY and AWLEN must remain stable throughout this time.” In Zazz, it might look like Figure 3. It says that when AWVALID is asserted, the assertion should wait until AWREADY is asserted, and then apply two constraints throughout this time: AWVALID must remain true and AWLEN must remain stable (the other control signals are omitted for simplicity).
Using the SVA Debug feature, Zazz generates some stimulus and allows the engineer to see how the assertion behaves, as shown in Figure 4.
Figure 6
Corrected waveform
We see that the assertion is failing on several scenarios. The problem is that the ‘$stable’ on AWLEN should not apply on the first cycle, but instead, only on subsequent cycles. The graphic also shows that the assertion triggers multiple attempts on the same event (which may not be the desired behavior for some assertions).
The corrected assertion and its associated waveform are shown in Figures 5 and 6, respectively.
This version sets a temporary variable (awlen) to hold AWLEN and then expects the AWLEN field to match this value until AWREADY is asserted (either immediately or on some subsequent cycle). In addition, the assertion checks that AWVALID remains true during this time period. The resulting waveform no longer displays the assertion failures and the sample waveforms match the original intent. (NOTE: this check should be expanded to check {AWLEN, AWSIZE, …} instead of just AWLEN).
Conclusion
While assertions can be a powerful addition to a design team’s arsenal, they force designers to spend time early in the design process adding quality assertions. Design engineers may resist adding assertions because of tight time constraints and the complexity of the SVA language. In spite of the time savings available during the verification process, adding assertions to the design process has for this reason remained a hard sell.
Tools improve ease-of-use for technologies like SVA to the point that designers can now easily incorporate assertions into designs. The inclusion of high-quality assertions throughout the design will minimize not only the time spent debugging designs, but also the time spent communicating issues between the design and verification engineers. These same assertions may also detect “hidden” failures that do not propagate to an observable point that results in testcase failure, increasing the chances of finding such problems before tapeout.
The current mindset that assertions belong only in the verification process needs to change. As designers begin to understand that assertions are easy to incorporate early in the design process, design teams can realize their benefits throughout design and verification.
Cyclic Design
T: +1 512 600 2147
W: www.cyclicdesign.com
Zocalo Tech
MCC Building
3925 Braker Lane
Austin
TX 78759 USA
T: +1 512 623 7711
W: www.zocalo-tech.com


